I've spent some time studying how to make trees for games. Trees are important because they often take up a large part of the screen so you need to be friends with them. As usual there are many different art styles you can chose from, but the trees I wanted to make were the trees from the game The Witness. They look like this:

Their trees have an art style called stylized, so they are obviously not 100 percent realistic looking. While The Witness developers have written three blog posts about the trees in their game, none of them described how the trees were made, so I had to guess. One article I found on how to make similar-looking trees is this one: Airborn - Trees. It argues stylized trees can be created by using a blob with a tree shape and then add random quads with a leaf texture to the surface of the blob:

This was the first tree I made in Blender: The mighty elm tree:

First I added an "Ico Sphere" blob and then I added a "Plane" which I unwrapped. To add the leaves I added a particle system to the blob. If you don't know how to randomly spread out a mesh on another mesh with a particle system, you can look at this tutorial: Blender Beginner Tutorial - Part 7: Particles.
But you can't currently export the leaves to a game engine like Unity because they are not their own object. To make them their own object, you can follow this process:
Update! If you are using Blender 2.8, the steps have changed. Now you have to select the blob with the particle system and convert the particle modifier. And to make them their own objects, you have to click on the following:

To make it all more tree like you need to modify the normals to make them more spherical. This will make the leaves face outwards and upwards from the center of the tree - to emulate the effect that light has on the growth of the tree. You do this by enabling "auto smooth" in the tab next to "modifiers." And then in the "modifiers" tab you add a modifier to the leaves called "Normal Edit" and select the blob as "Target object used to affect normals." The leaves with the blob should now look like this:

And if you export it all to Unity, the result will look like this:


The leaf texture is just random leaves painted with a transparent background:

You can see that the elm is kinda round. To get a less round tree shape you can instead of adding random leaf-planes to the faces of the blob (a setting in the particle system), you can add them to the volume of the blob and then not display the blob at all in the game. You can also add more blobs to get other tree shapes, but the process for each individual blob is still the same.
The process to make the spruce tree is similar. The difference is that you add the branches (which is now a mesh and not just a plane) not to a blob, but to the to the spruce trunk with a particle system. To make the shape more spruce like, you need to use the "Vertex Groups" settings in the particle system by changing the density (no branches at the bottom) and the length (shorter branches on the top). The vertex weight is a value between 0 and 1 and 1 means the longest branch.

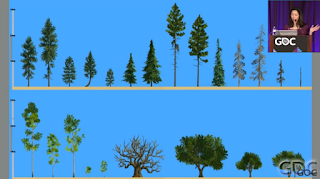
You might argue this method of making trees is inefficient. How long will it take to make an entire forest of trees? The answer comes from the game Firewatch. They said in a GDC talk that they only used 14 tree models to build a forest with 4600 trees.
And if you put the trees in a game, it looks like this:

You can test the game here.

Their trees have an art style called stylized, so they are obviously not 100 percent realistic looking. While The Witness developers have written three blog posts about the trees in their game, none of them described how the trees were made, so I had to guess. One article I found on how to make similar-looking trees is this one: Airborn - Trees. It argues stylized trees can be created by using a blob with a tree shape and then add random quads with a leaf texture to the surface of the blob:

This was the first tree I made in Blender: The mighty elm tree:

First I added an "Ico Sphere" blob and then I added a "Plane" which I unwrapped. To add the leaves I added a particle system to the blob. If you don't know how to randomly spread out a mesh on another mesh with a particle system, you can look at this tutorial: Blender Beginner Tutorial - Part 7: Particles.
But you can't currently export the leaves to a game engine like Unity because they are not their own object. To make them their own object, you can follow this process:
- Select the blob and press Shift + Ctrl + A. The leaves are now their own objects
- But the leaves still share the original mesh, so it may be difficult to combine them into one object. To solve this problem you select all leaves and press U and select "Object & Data & Material + Tex"
- To join them into one mesh you just select one leaf and then the other leaves and press Ctrl + J
Update! If you are using Blender 2.8, the steps have changed. Now you have to select the blob with the particle system and convert the particle modifier. And to make them their own objects, you have to click on the following:

To make it all more tree like you need to modify the normals to make them more spherical. This will make the leaves face outwards and upwards from the center of the tree - to emulate the effect that light has on the growth of the tree. You do this by enabling "auto smooth" in the tab next to "modifiers." And then in the "modifiers" tab you add a modifier to the leaves called "Normal Edit" and select the blob as "Target object used to affect normals." The leaves with the blob should now look like this:

And if you export it all to Unity, the result will look like this:


The leaf texture is just random leaves painted with a transparent background:

You can see that the elm is kinda round. To get a less round tree shape you can instead of adding random leaf-planes to the faces of the blob (a setting in the particle system), you can add them to the volume of the blob and then not display the blob at all in the game. You can also add more blobs to get other tree shapes, but the process for each individual blob is still the same.
The process to make the spruce tree is similar. The difference is that you add the branches (which is now a mesh and not just a plane) not to a blob, but to the to the spruce trunk with a particle system. To make the shape more spruce like, you need to use the "Vertex Groups" settings in the particle system by changing the density (no branches at the bottom) and the length (shorter branches on the top). The vertex weight is a value between 0 and 1 and 1 means the longest branch.

You might argue this method of making trees is inefficient. How long will it take to make an entire forest of trees? The answer comes from the game Firewatch. They said in a GDC talk that they only used 14 tree models to build a forest with 4600 trees.

And if you put the trees in a game, it looks like this:

You can test the game here.
These look great! How did you create the leaves for the pine trees, the one that slopes downward?
ReplyDelete